Creek System Test provides black-box functional testing of your microservices, running in local Docker containers.
ProTip: There is a Gradle plugin for running system tests as part of a Gradle build that should be used in preference to invoking the test executor manually!
Simply put, Creek system tests provide black-box testing of microservices. The system tests start your service or services, and any additional 3rd-party services they need e.g. Kafka, Schema Registry, etc., in local docker containers, then run the test suites you’ve defined.
System tests are written in YAML. Test suites define initial seed data and test cases that define the inputs to feed into the system, and the expected output or final state of the system.
Terminology
First, let’s define the terminology we’ll be using:
| Term | Meaning |
|---|---|
| Test Case | A single test, defined within a test suite, that defines the inputs to feed in and expected output. The test either passes or fails. |
| Test Suite | A YAML file containing a collection of test cases and additional metadata, e.g. which services should be started. |
| Test Package | A directory containing seed data and one or more test suites. |
| Seed Data | A common set of pre-requisites to feed into the system before starting any of the services under test, e.g. records in a Kafka topic, stored withing a test package. |
| Input Data | Data the system tests feed into the system as part of running a test case, i.e. the input that should trigger the expected output, e.g. a record produced to a Kafka topic. |
| Expectations | Expectations the system test will check once all an input has been fed into the environment for a test case, e.g. an expectation of a certain record in a Kafka topic. |
| Test Environment | The set of Docker containers started by the system tests to run your services and any other services they require, e.g. a Kafka cluster. |
Writing system tests
System test directory structure
A test package is made up of a directory containing one or more test suites, and subdirectories containing inputs, expectations and, optionally, seed data:
| Directory | Content |
|---|---|
<root> |
Aside from containing the below directories, the root also contains one or more test suite YAML files. |
| seed | (Optional) Each YAML file within the directory defines seed data that is fed into the system before the services under test are started |
| inputs | Each YAML file defines a set of input data to be fed into the system that a test case can reference by name, e.g. producing a Kafka record, writing to a file, etc. |
| expectations | Each YAML file defines a set of expectations on the state of the system that a test case can reference by name, e.g. a Kafka record in a topic or a file in s3 etc. |
The directory structure of the system tests can contain a single test package:
 $testsDir
    |--seed
    |   |--a.seed.yml
    |   |--another.seed.yml
    |--inputs
    |   |--an.input.yaml
    |   |--another.input.yaml
    |--expectations
    |   |--an.expectation.yaml
    |   |--another.expectation.yaml
    |--a.test.suite.yaml
    |--another.test.suite.yaml
… or multiple test packages (YAML files removed for brevity):
 $testsDir
    |--package-1
    |  |--seed
    |  |--inputs
    |  |--expectations
    |--package-2
    |  |--seed
    |  |--inputs
    |  |--expectations
    ...
… or indeed any number of levels of sub-directories you may wish to use to organise things:
 $testsDir
    |--package-1
    |  |--seed
    |  |--inputs
    |  |--expectations
    |  |--sub-package-a
    |     |--seed
    |     |--inputs
    |     |--expectations
    |--dir
    |  |--package-2
    |    |--seed
    |    |--inputs
    |    |--expectations
    ...
Example system test package
The easiest way to get familiar with the format is to look at an example.
The example will be a Kafka-Streams based microservice, so the examples below will be making use of the Creek Kafka Streams system test extensions. The extensions define seed and input extensions for producing data to Kafka and expectation extensions for checking data is in Kafka. See the test extension’s docs for more info.
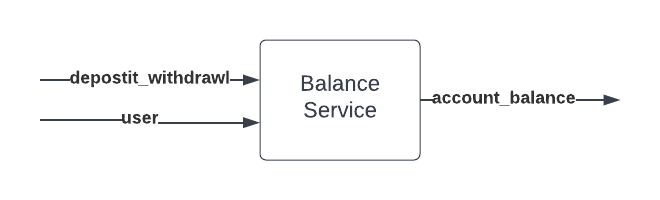
Let’s look at testing a fictitious balance-service that tracks user balances.
The balance-service consumes a stream of deposits and withdrawals from the deposit_withdrawal topic and outputs an
aggregated account balance for a user to the account_balance changelog topic.
For the benefit of this example, let’s also say the balance-service reads a user changelog topic which contains a
table of user data. Our service uses this user data to enrich its own output, (a questionable architectural design,
but useful for the sake of our example!).
Seeding the test environment
To test the system, we may want to seed the test environment with some initial user data:
---
'@type': kafka_topic
notes: Seed environment with base set of user data
topic: user
records:
  - key: 1876
    value:
      name: Bob Smith
  - key: 20368
    value:
      name: Alice Peterson
The @type field in seed/user.yml is set to kafka_topic, which indicates to the system tests that the file holds
records that should be produced to Kafka. The rest of the fields within the file are specific to the kafka_topic
seed type extension (See Kafka system test extensions for more details). However, they’re hopefully pretty
self-explanatory:
The seed/user.yml file defines two users that will be produced to the user topic before any of out balance-service
is started. The key of the record is a numeric user-id and the value holds information about the user, which is just
their name in our simple example.
A test package can define multiple seed files defining multiple sets of seed data that should be used to seed the test environment with data.
Writing a test suite:
With the environment seeded with some user data, lets go ahead and define out first test suite:
---
name: smoke test
services:
  - balance-service
tests:
  - name: processes deposit
    inputs:
      - alice_deposit_100
    expectations:
      - alice_balance_100
  - name: processes withdrawl
    inputs:
      - alice_withdraw_25
    expectations:
      - alice_balance_75
Multiple test suites can be defined by adding more files in the root directory.
Each test suite is run with a clean test environment.
Bringing up and seeding a test environment is a relatively time-consuming task, which you may want to consider before
breaking things up into many suites.
Test cases within a suite run sequentially after the seed data has been published and all services started.
This means the second and subsequent test case are affected by previous test cases and the system state they result in.
This example file defines a test suite that starts our balance-service and runs two test cases. The fist test case
is playing in a alice_deposit_100 input:
---
'@type': kafka_topic
topic: deposit_withdrawal
records:
   - key: 20368
     value: 100
…this plays in a single Kafka record, keyed on the user-id, in this case Alice’s, and the value contains amount deposited.
The first test case also defines a single alice_balance_100 expectation:
---
'@type': kafka_topic
topic: account_balance
records:
   - key: Alice Peterson
     value: 100
…which checks that a record has been produced to the account_balance topic with the user’s name as the key and
the users balance as the value.
The second test case plays in:
---
'@type': kafka_topic
topic: deposit_withdrawal
records:
   - key: 20368
     value: -25
…and expects:
---
'@type': kafka_topic
topic: account_balance
records:
   - key: Alice Peterson
     value: 75
The test package directory for the above example would look like:
 $testsDir
    |--seed
    |   |--user.yml
    |--inputs
    |   |--alice_deposit_100.yaml
    |   |--alice_withdraw_25.yaml
    |--expectations
    |   |--alice_balance_100.yaml
    |   |--alice_balance_75.yaml
    |--smoke-test.yml.yaml
Testing multiple services
Testing multiple services together is straight forward. Simply list all the services that should be started in the test suite, in the order they should be started, and then define seed, inputs and expectations as normal. The system tests will start your services, pump in the inputs and assert the expectations.
Disabling tests
Test cases and whole test suites can be disabled by adding a disabled reason and optional associated issue url.
For example:
---
name: example test suite with disabled tests
services:
  - some-service
tests:
  - name: disabled test
    disabled:
      justification: put your justificiation/notes on why its disabled here.
      issue: http://link.to.associated.issue.tracking.the.disabled.test
    inputs:
      - some_input
    expectations:
      - expected_output
  - name: enabled test
    inputs:
      - some_input
    expectations:
      - expected_output
---
name: example disabled suite
services:
  - some-service
disabled:
  justification: put your justificiation/notes on why its disabled here.
  issue: http://link.to.associated.issue.tracking.the.disabled.test
tests:
  - name: test
    inputs:
      - some_input
    expectations:
      - expected_output
Running system tests
There is a Gradle plugin for running system tests as part of a Gradle build.
Happy to take contributions for a Maven plugin .
Debugging system tests
The system tests leverage the AttachMe IntelliJ plugin to simplify attaching the debugger to Creek based services running within Docker containers. You can read more about the AttachMe plugin here .
Assuming the AttachMe plugin is installed, running and listening on the correct port, and the microservice is correctly configured, then debugging the service is as simple as setting breakpoints in the code and then passing the service, or service-instance, name(s) on the command line when running system tests.
Specifying service names allows all instances of the service to be debugged.
The service name to use is the same as the names used in the services field of a test suite,
for example, my-service.
Specifying service instance names allows only a specific instance of a service to be debugged.
Instance names are in the form
The exact mechanism / command line required to debug a service will depend on the build plugin used. See the System Test Gradle plugin documentation for more information.
Configuring a service for debugging
ProTip: Template repos, such as Aggregate Template are correctly preconfigured for service debugging
To be able to debug a Creek Service the following must be true:
- The AttachMe agent must be present on the local machine at
~/.attachme/attacheme-agent-x.x.x.jar. Running an AttachMe run configuration in IntelliJ will cause the plugin to download the agent jar to your home directory. - The service’s
DockerFileneeds to be tweaked to handle the agent. This includes installing thelsofcommand, as this is required by the agent.RUN yum install -y lsof
How it works
When the AttachMe plugin is first run it downloads an agent jar and script to the user’s home directory under
~/.attachme.
To use AttachMe normally, a user would create and run an AttachMe configuration and then source the ~/.attachme/config.sh
script in a terminal window to set the JAVA_TOOL_OPTIONS environment variable to install the agent and set up the
debugging parameters. Any java process started from the terminal, or any child processes it starts, will
automatically pick up the JAVA_TOOL_OPTIONS and spawn a new debug window in IntelliJ.
This is very cool and useful in itself, and I’d recommend you read the blog post on the topic to learn more.
When debugging services during system testing the agent jar is made available to the service by mounting a directory
containing the jar into the service’s container, and configuring the Java agent via the JAVA_TOOLS_OPTIONS environment
variable when creating the Docker container.
When the service starts up, the AttachMe agent calls out to the AttachMe plugin, letting it know what port
the service is listening on for the debugger to attach. The plugin passes this on to the IntelliJ debugger, which
then connects to the service.
ProTip: the service is configured to wait for the debugger to attach, so if the AttachMe Configuration is not running the service will timeout on startup.
Known failures to debug
Cannot run program “lsof”
If you see an error like the following:
Picked up JAVA_TOOL_OPTIONS: -javaagent:/opt/creek/mounts/debug/attachme-agent-1.2.1.jar=host:host.docker.internal,port:7857 -agentlib:jdwp=transport=dt_socket,server=y,suspend=y,address=*:8000
Listening for transport dt_socket at address: 8000
[attachme] Initialized agent for process PID=1
java.lang.RuntimeException: java.io.IOException: Cannot run program "lsof": error=2, No such file or directory
        at com.attachme.agent.CommandPortResolver.getPortCandidates(CommandPortResolver.java:45)
        at com.attachme.agent.Agent$DebugPortTask.run(Agent.java:94)
        at java.base/java.lang.Thread.run(Thread.java:829)
Caused by: java.io.IOException: Cannot run program "lsof": error=2, No such file or directory
        at java.base/java.lang.ProcessBuilder.start(ProcessBuilder.java:1128)
        at java.base/java.lang.ProcessBuilder.start(ProcessBuilder.java:1071)
        at com.attachme.agent.CommandPortResolver.getPortCandidates(CommandPortResolver.java:36)
        ... 2 more
Caused by: java.io.IOException: error=2, No such file or directory
        at java.base/java.lang.ProcessImpl.forkAndExec(Native Method)
        at java.base/java.lang.ProcessImpl.<init>(ProcessImpl.java:340)
        at java.base/java.lang.ProcessImpl.start(ProcessImpl.java:271)
        at java.base/java.lang.ProcessBuilder.start(ProcessBuilder.java:1107)
        ... 4 more
…then the docker image is missing lsof.
See Configuring a service for debugging
Service being debugged hangs on startup
The service will block waiting for the debugger to attach. Therefore, it’s likely the debugger is not attaching. The most common causes this are:
- An AttachMe configuration is not running. Once the Intellij plugin is installed you will need to create a new “run configuration” in IntelliJ to run it. See the blog post for details.
- The port the AttachMe plugin is listening does not match the one the service is calling out on. The default port
used by the AttachMe plugin is
7857. The same default is used by Creek. However, if you need to change the plugin’s default for any reason, you’ll need to also tell the Creek system tests. See the documentation for the build plugin you are using.
System test extensions
Creek is designed to be extendable. Extensions can be written to allow services to interact with new types of external technologies and resources, e.g. a new database type or an AWS cloud service, like S3. When extending Creek in this way, the implementer of the extension will also likely want to provide an extension to the Creek system tests, enabling users of the extension to test their services.
Documenting how to write system test extensions is tracked by issue-20 .